Showing posts with label scraps. Show all posts

Saturday, 21 December 2024

Scraps 'n Boro

Since making my Hourglass blocks, I’ve decided against trying to find a suitable fabric for sashings.  At least until I get home.  Unless we are hooked up to electricity at a marina dock, solar panels can only produce so much and our fridge & freezer must always come first.  Along with navigation instruments and trusty computers for weather reports.  So, my sewing machine has not seen light of day since we started heading north.  And whilst fabric is nice to have, it adds extra weight to my (one) travel suitcase. I like to travel light.  With all this in mind, it was back to Plan A, which was of course, making bags from leftover scraps.  

Two pieces fairly heavily stitched. Hardly exhibition quality
but it won't matter for an everyday bag or wallet
So now, I’m currently hand stitching scrap pieces – and attempting a bit more boro!  Basically, my process is an assemblage of bits of scraps on a cut-to-size piece of thin cotton batting and a light backing of flour sack cloth.  I think I purchased the flour sack cloths in a pack I found in the cleaning products area of Walmart a few years ago.  They look a bit like a more robust cheese cloth and the whole lot just needles through quite nicely.

The batting size is cut mostly 13 x 8 inches with the cloth backing slightly larger.  Once the scraps are down and held by pins or glue.  I use 1” masking tape as a guide for my stitching lines to keep them straight, then stitch the rest, mostly by eye.  I’m happy doing that (keeping it simple) rather than being too creative with other designs.  Its relaxing and achievable, even on a boat anchored out in the middle of nowhere… 

You can see how I pinned the pieces, then stitched
guiding lines 1" apart, making the final stitching easier
My thread of choice has been Perle #8 in two shades of pink.  A nice big-eyed sashiko needle helps make threading easy too.  

When the pieces are all stitched and any loose threads trimmed, then I’ll decide exactly how best to incorporate these pieces into a project of some sort.  Perhaps a dolls bed quilt for my larger piece?  That might make me rather popular!  Anyway, keeping an open mind for now...

And for the back.  Not sure I want that to be seen!
I'll post a photo of the final product when it is done... could be a while yet!!

Tuesday, 5 November 2024

What a Year, 2024!

So, here we are.  The start of November.  And very little in the way of quilting achieved this year…  All, well mostly all, due to our sailing plans that seem to have taken on a life of their own.  So, what happened?

Supermarket run in our 'other' car

  • Our intent for an early start (Feb) this year to get from Trinidad to the US before hurricane season, (June to November) fell apart, waiting on visas. So, the plan was re-written.
  • We added a bit more work to our list for completion in Trinidad, as you do, while we were hauled out.  So, very slow off the starting block and yet another plan was made.
  • Hurricane Beryl (1 July 2024).  We were not affected, thankfully.  Our revised plan had been to do a a few months of cruising with a visiting friend, then return to Trinidad in September, haul out and fly home.  Not long after arriving In Carriacou (Grenada) and then a few days later in Bequia (SVG), we watched closely, a developing weather system, working its way toward the southern Caribbean islands.  We moved further north to St Lucia avoiding catastrophe unleashed by quickly strengthing Beryl, with, for us, only storm-force winds to contend with.  Tucked well into the lagoon here, we also avoided tidal surge that caused enormous coastal damage.  Given decimation of the islands to our south, the flight of many cruisers to safety in Trinidad and lack of available space to haul in the Chaguaramas boatyards, it made sense to stay in St Lucia. So, we did!

By then, Hurricane season was well underway, islands to our south seriously damaged and Trinidad facilities stretched to the limit.  Leaving our boat for the season in St Lucia was not an option either, though surprisingly, many do.  We slipped sideways, into our next plan.  As going home was now out of the question, we decided to stay with the boat in St Lucia, then when the coast was clear, in November hopefully, make a dash for Chesapeake Bay, in the US, parking our boat and heading home, we’re hoping, by March 2025.  Phew!

Scrappy & colourful hexies (last of the snowflakes!)
During our stay in St Lucia, I’ve managed to stitch the last of my Kingfisher hexies (aka St Lucia snowflakes) on to pre-cut backgrounds.  I’d started stitching them the previous year when we stopped in St Lucia - time flies!  In the hope of getting some stitching time this year, they were part of a little pack of handwork I had prepped to take away with me.  Having finished all the applique, I decided not to stitch the blocks together (given bold background colours) until I get home and can arrange them on my design wall.  Sewing on a boat is do-able, I’ve decided, as long as it’s handwork, easy to pick up and put down, and compact – storage space is limited.

Scrappy Hourglass Variation
I had also packaged up with my supplies, a bag of scraps to make some small bags.  My plan was to stitch them by hand, boro style, then assemble them at home.  However, with time on my hands, and a recently serviced, teeny-tiny sewing machine (not to mention oodles of electricity at the dock!!) I changed my mind, deciding I could manage a few quilt blocks for a scrappy quilt. 

All I had was a selection of lights and darks; no background fabric.  Quilts and quilt making is not a “thing” here in St Lucia.  Tropical weather will do that for you!  So, with no chance of finding something for a background (we’d also had a recent wardrobe cleanout, so nothing there either!!), the hunt was on for a suitable block.  Funnily enough though, I ended back at BethShibley’s Hour Glass Variation.  Big, bold and easy to cut shapes, HST’s that I could manage in my tiny space with only a few tools, and enough scraps to assemble 30 11 inch blocks, with little waste!  Best of all, this pattern works very nicely with a light/medium and a dark contrast, then a cross of either in a colour match. 


Quilter at work - keeping it tiny is not easy!
Let me just say, that a $70 Walmart Brother sewing machine is not quite my ageing Bertie Bernina, but once I’d discovered its foibles (with quite a bit of unpicking), I had 30 colourful blocks to play with.  A sheet became my temporary design wall, however I packed the blocks away to assemble at home.  Availability of fabric for sashing was the hold-up…  My hope is that we can stop in St Martin briefly so that I can visit Lyseth’s “A Stitch at a Time” in Cole Bay.  That’s where I found those beautiful blues for my first Hourglass Variation – also waiting at home for me to sew together.  Next year, I suspect my quilting time at home will go rather too quickly…

Oh, and just to be sure you know, even though I sneakily reduced my mission to complete 9 items in 2024 down to 4, not one thing, on either list, was finished!  Ha ha!  Sometimes, you've really just got to laugh at yourself...  Still, I love a good list and I'm sure next year will be filled with them!

Sunday, 8 October 2023

Snowflakes in St Lucia

Every year I take something away with me to sew.  I nearly always carry those projects home untouched.  This year however, was different; I made myself start stitching a box of hexies whilst we were sitting in some welcome St Lucia sunshine. And yes, I've discovered EPP at last. 

My motivation was a cute quilt designed by Rachel Hauser offered as a Stitch-Along project, dare I say it, 5 years ago!  The quilt, called Kingfisher, is simple - even cutting the diamonds and the instructions are clear and precise.  

Whilst at home, I'd prepped up by cutting shapes from scrap box leftovers, gluing (Sue Daley's glue pen) them on whilst watching the telly at night.  This was no precise, fussy-cut project.  I was looking for a riot of colours and indeed, a "happy quilt" outcome.  I've now got a box of more than 100 hexie flowers (the boys called them "snowflakes"), just waiting to be stitched onto my diamonds.  


Thursday, 28 July 2022

Cheese & Mustard

Scrappy Bow Ties: 2021  (Started: 2020)

There’s nothing better than putting together all those odd scraps that are too good to throw away but just never seem to be "just right" when planning a new quilt.  I certainly needed to find something to suit a bundle of squares I’d cut ages ago that were sitting idly in my scrap bin.  Enthused by Bonnie Hunter’s scrap philosophy, and the amazing results she achieves, I launched into her Cheddar Bow Ties pattern (2011).  

All I needed were 3 x 2 ½" squares of each fabric to be able to cut sufficient bow ties to make blocks for a decent sized quilt.  Bonnie used a cheddar fabric as her background. Yellow cheese is very popular in the US.  (US-ians like their butter white, too!  We think it’s a real hoot since we’re partial to white cheese and our yellow butter!).  Back to background choices…for some mad reason I went for a caramel colour (Dijon mustard, anyone?) which looked fine with my individual blocks but somehow became Doctor Strangelove and took absolute control when the top was finally pieced.  It was too late to make any changes, so I just had to go with the “flow” and try to make the best of a not-so-appealing background.  

This was supposed to be a “quickie” but I guessed machine quilting was not going to do anything to soften my background choice, so instead settled on hand quilting and using a thick perle cotton thread.  Deep in my thread box, I discovered some skeins of sashiko thread; a nice variegated red through green with an acid green/yellow as well.  I needed a crowbar of a needle, no hoop, miles of masking tape and lots of patience; but it’s finished at last.  The lines are ½” apart and I worked out each one took about 45 mins or more to do.  At best, I managed 3 rows a night, with regular breaks to rest sore fingers.  I’m holding off doing some Japanese boro work for a little while now.  Although I NOW have to confess to loving the look.

I tidied up the edges with a wild Aboriginal design full of colour and movement.  It’s Shirleen Campbell’s “Women Dancing for Rain‘.  It’s an unusual choice for me for this type of quilt but came about after (fabric) shopping with my quilting buddy, Yvonne.  It really does help to step back sometimes and consider other people’s opinions.  


Just for the Record:
Quilt Finished Size: 169 x 169cm 
Block Sizes: 10” (made up of 4 x 5” bow ties) 
Cut in: 12 Apr 2020 (started)
Pieced: 22 May 2020
Basted: 18 Jun 2020
Quilted: Hand: 28 Sep 2021
Quilting Thread: Japanese Sashiko Thread x 2 skeins
Quilt Type: Traditional 
Quilt Finished: 30 Sep 2021
Exhibited: 
Collection: Home #073
Pattern Name: Cheddar Bow Ties
Pattern Source: Bonnie Hunter, 2011
Fabrics Purchased: From the Stash…
Fabric Design: Prints, Stripes & anything to hand really
Fabric Style: Old to Bold
Materials Type: Printed Cottons 
Wadding Type: Cotton
Backing: Pieced using left-over remnants 

Wednesday, 13 July 2022

Further Reductions to the Scrap Box

Doll’s Bed Quilt: 2021

Little Miss came to stay and while I stitched some of her “clothing repairs”, I set her a task to make a pretty design using some 2 ½” squares I’d cut from leftovers for my scrap bin.  I’d been inspired by Pat Sloan’s very practical scrap sorting philosophy.  Let’s just say, it’s a fantastic idea and soooo organised…but a lot of work (just yet for me, anyway!) with my scrap box still fit to burst.

We decided that her design looked so nice it was deserving of being sewn up into a doll’s quilt.  I finished it off after she’d left for home, adding a cute little pillow and as a special surprise, finished off a cloth doll kit she’d been given as a gift. 

How wonderful to finish something in a matter of days! 

I watched quite a few great videos to work out sizing and this one by Treasurie (less than 4 minutes) was certainly helpful, particularly for making the pillow and pillow case.  Size depends very much on the doll and the bed you have. 


Just for the Record:
Quilt Finished Size: 37 x 40cm
Pillow Finished Size: 19.5 x 11cm
Mermaid Finished Size: 36cm tall
Block Sizes: 2”(quilt & pillow) finished
Cut in: 18 Aug 2021 (started)
Pieced & Basted: 25 Aug 2021
Quilted: Machine: 25 Aug 2021
Quilt Type: Doll Quilt
Quilt Finished: 28 Aug 2021
Exhibited:
Collection: Gifted #23
Fabrics Purchased: From the Stash…
Fabric Design: Prints, Stripes & Dots
Fabric Style: Brights
Materials Type: Printed Cottons
Wadding Type: Cotton
Backing: Pieced using left-over remnants

Tuesday, 14 December 2021

Louisiana Charm

 LeMoyne Stars: 2020  (Started: 2020)

By April 2020, I’d realised that living with COVID was going to be challenging.  I belong to a (non-quilting) group with a small membership who had been unable to meet but we hoped to have a Christmas gathering in order to raise funds for those more deserving.  I thought a simple quilt would make a suitable auction item and help out a bit.

I settled on a Lemon Star pattern from Jenny Doan, Missouri Star Quilts (her fab tutorial 28 Feb 2020, is here) and a nice subtle colour palette of pinks, maroons, greens and creams.  It became my first introduction to making multiple HST’s (half square triangles) which worked out simply and easily, especially with being able to watch Jenny closely and learn from her tips & tricks. 

With little fuss, and seemingly in no time at all, I had a nice top ready to quilt, with time to spare (just) before the gathering.  I normally take at least 2 years to make a quilt, so I was actually rather worried about meeting my deadline.  It all worked out well in the end.  The quilt found a lovely home, a tidy sum was raised, and my stash is slimming off…albeit rather too slowly.

Scrappy stars, pretty in pink (hanging from the "sail loft")

To my mind, the finished quilt had a bit of a French air about it.  The traditional LeMoyne Star block is thought to have originated about 1834 and is named after the Le Moyne brothers who settled in the French Colony of Louisiana in 1699.  Later, in 1718, they founded New Orleans.  The State is home to the Mississippi River, wet-lands called bayous, shrimp boats and oil rigs.  Think vibrant jazz and foot-tappin’ zydeco.  And alligators.  Let’s not forget the ‘gators. 

Out in the garden with that cranky helper, again... 
Just for the Record:
Quilt Finished Size: 190 x 190cm 
Block Sizes: 10” 
Cut in: 17 Apr 2020 
Pieced & Basted: 22 Oct 2020
Quilted: Machine: 1 – 11 Dec 2020
Quilt Type: Traditional
Quilt Finished: 12 December 2020
Exhibited: 
Collection: Home #069
Pattern Name: Lemon Star
Pattern Source: Missouri Star Quilts Tutorial 28 Feb 2020
Fabrics Purchased: From the Stash…
Fabric Design: Traditional Prints & some Stripes
Fabric Style: Soft
Materials Type: Printed Cottons 
Wadding Type: Cotton
Backing: Pieced using left-over remnants & blocks
Underway & trying to find the right balance
of colour for the borders..as you do!

Tuesday, 28 November 2017

Moody Blues

Not quite sure what I had in mind for this section, perhaps it is just as well to start off with quilts started in 2017…  So here we go - the only one (sigh!!).
Pandora’s Blues: 2017  (Started: 2017)
Having been absent from my quilting lair and suffering somewhat from being overly fixated on scrap quilts, I poured my time into looking for a “fast fix”.  Meaning of course, that I sat in front of my computer and day-dreamed about what I could be sewing instead of actually taking myself off to my machine and just getting on with it.  Still it was fun (& don’t you just love web sites that point you in the direction of free quilt downloads_try this one, Quilt Inspiration) and I managed to unearth a design, from Cotton & Steel that got my heart beating – and eventually the Bernina humming, again. (The pattern’s a freebie to download. Link HERE. Isn’t that nice of them!)

This is the first_ Pandora's Blues

Back of Pandora's Blues
The result is slightly smaller than the original and certainly more colourful as the quilt became something of an “empty the fridge” type mix, and my box of blues looked almost in danger of becoming empty.  There is nothing like a stash buster to make one’s machine sing and lighten the mood of someone with “quilters block”.  In fact, I madly cut away (and even consigned to the bin smallish pieces not suitable for applique) my churn dash shapes without really thinking about how many I would need – my mood was not on a precise setting.
The result was enough blocks for two not-quite-single bed quilts.  I played with the blocks for a while on my design wall (a flannelette sheet) until I had them suitably assigned and set about sewing them in rows – no sashing.  My quilting was even more spartan, just a couple of lines in-the-ditch.  These were no show ponies.  One now resides on my bed in my home-away-from-home and the other has been gifted as a snuggle rug to my soon to be grandchild #2 – who incidentally will have a passion for blues even if the baby turns out to be a girl.  Just like her grandmother!!
Nothing quite like a breaking drought is there to bring back a bit of the old creative drive! 
And this is Pandora's Blues_Remix...
enough left-over blocks for a second quilt

Back of Pandora's Blues_Remix 
Just for the Record:
Quilt Finished Size: 160 x 182cm
Block Sizes: 20cm (8") 
Cut in: Apr 2017
Pieced & Basted: Aug 2017
Quilted: Machine Sep 2017
Quilt Type: Modern Scrappy
Quilt Finished: September 2017
Exhibited: Never
Collections: Pandora's Blues 
Gifted to William Burhmann,“Old Bill” March 2025 &
Pandora’s Blues - Remix, gifted to new baby Grandson Dexter on 16 Oct 2017
Pattern Name: Indigo Dash (a Churn Dash block)
Pattern Source: Cotton & Steel_Web link HERE
Fabrics Purchased: Selected from the Blue Stash…
Fabric Design: Varied
Fabric Style: Varied Collection over many years
Materials Type: Printed Cottons
Wadding Type: Cotton
Backing: Pieced using up even more of my blues

Making good use of my Pandora's Blues quilt in my floating home until it was 
re-homed with "Old Bill" in his new cabin, Deltaville VA
(the one underneath is a cheapie to hold the fort until I have both time & energy)

Monday, 27 November 2017

Memory Lane

Memory Lane: 2017  (Started: 2015)
Hanging over my stairwell
For quite a few years now I’ve been besotted with the notion of finishing things and naturally, using up scraps.  Boxes of ‘old fashioned’ fabrics seem to multiply in my Garden Shed, almost before my eyes and to be honest, I was getting a little tired of it!  Especially when there are so many beautiful and colourful fabrics of offer – and on such a regular basis.  I’m tired of resisting…as you can understand!
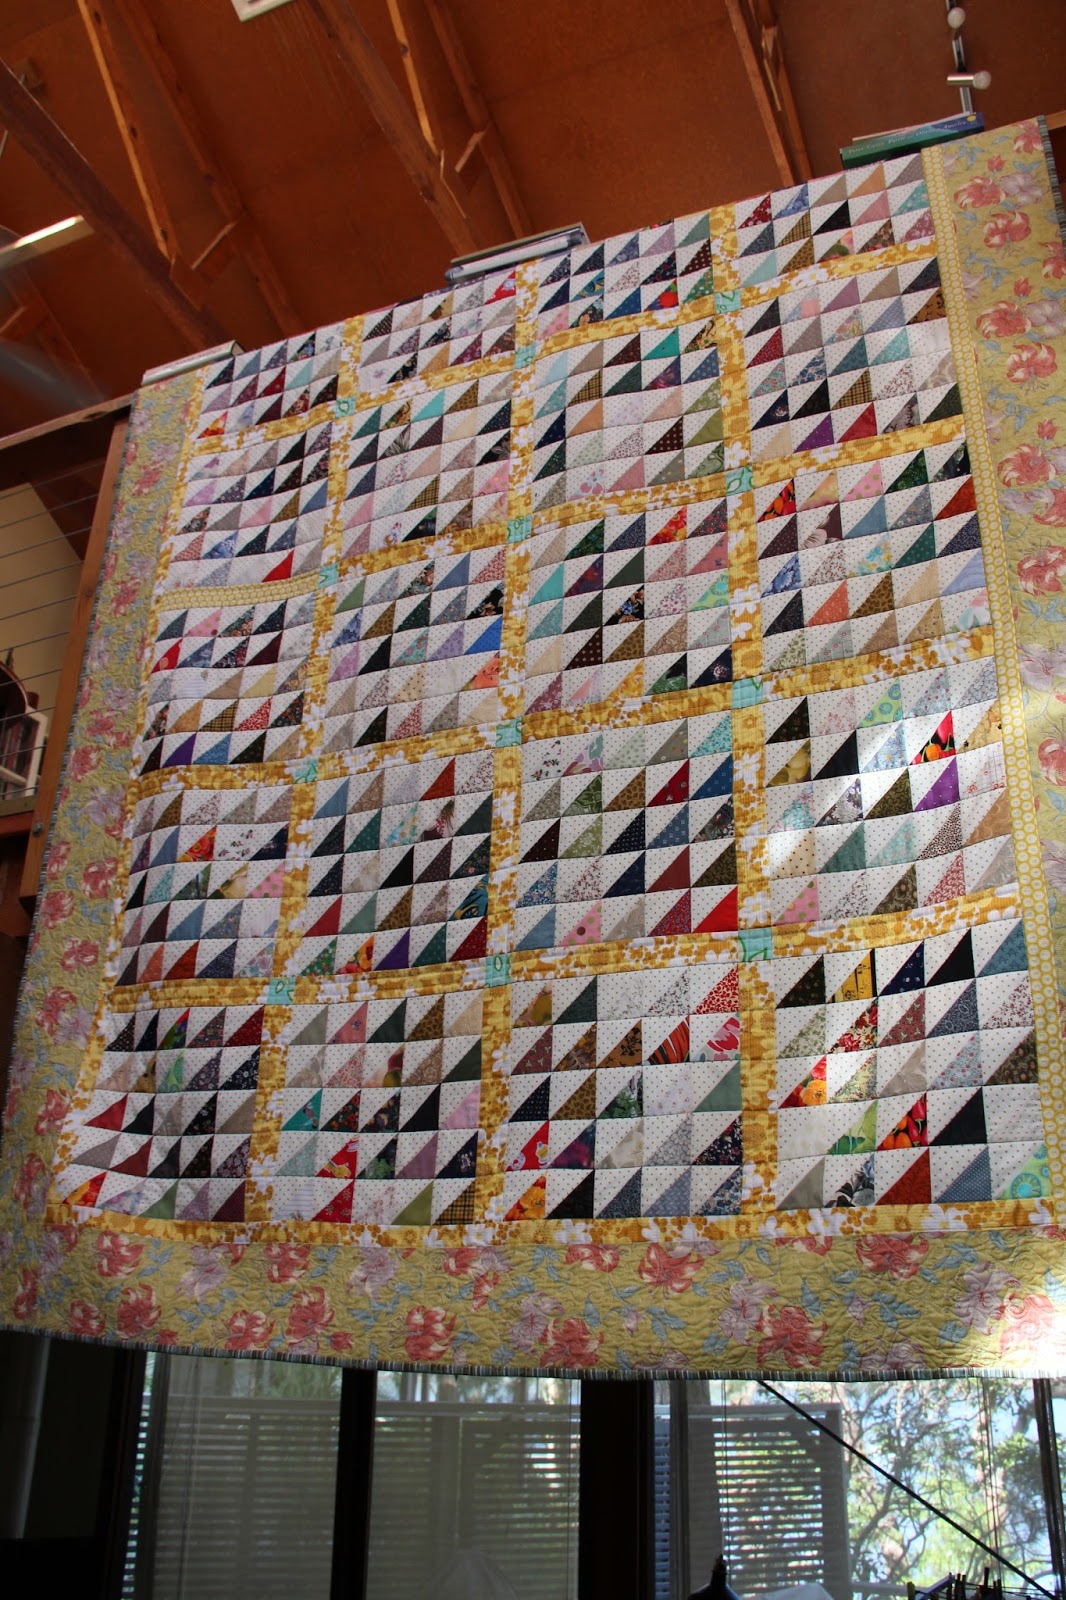
Imagine my delight when in mid-2015, a fantastic and colourful scrap quilt by Jen Kingwell graced the cover of Quiltmania (of which I'm also a big fan).  Yahooie!  I’m Triangle Crazy too…  It was a perfect opportunity to get over my fug, warm up the machine and use up lots AND lots of scraps. 
After much chopping of left-overs, I decided to head off to rummage through a couple of patchwork shops for some kind of background to suit the scraps, which could at best be described as an exotic mix.  I finally settled on white with a pale green spot.  My Mum had saved some dress fabric scraps too, from a dress I’d made and long since discarded.  Perhaps it might now be even be considered vintage apparel.  Happily, there was enough to wiggle out some sashing strips.
I started piecing the quilt in October and had it basted by December (2015).  Not bad going.  I knew the delay was going to be in the quilting, but that’s another story. 
Appliques made by my Grannie in the 70's
(possibly from a Woman's Weekly pattern)
When the time came to make a signature block for the back, I used up a couple of appliques made by my Grandmother for an apron she was making.  I had a wonderful time going back down memory lane remembering my stay in her tiny but none-the-less jam-packed sewing room and her awful machine that used to try its best to regularly shock me (until I got wise and wore sandals).  Ahhh, memories!  That’s essentially how I chose my quilt’s name and why it’s dedicated to her.
There’s a lot of detail I don’t have access to right now, so at least I can share a photo or two (finally taken in 2017 after I'd finished it).  

Saturday, 2 April 2016

Absolute Magic

Garden Games: 2015  (Started:2014)
Garden Games
In March 2013, some of the RLI Girls were busy working on a pattern called Circles of Fun by Sue Ross.  Fun - sure!  What I really did like about it was that the pattern could handle a variety of colourways (antique, vintage, and classic to modern) and still look great.  Best of all though, was its paper pieced rings of scraps (the classic pattern is called wagon wheels) and the dreaded scrap basket certainly could take a beating with this one. 


After some convincing (almost 12 months) and the gift of an enormous bag of leftover scraps (Did I really need more?), I started work on my very first paper pieced project.  The machine hummed and so did I. 
My bin began to fill with teeny fabric bits, and although I rescued a few large enough for applique pieces, I rather enjoyed seeing a diminishing scrap box.  Work on the quilt resumed after a long break and by mid-March 2015, the borders were ready to go on. 


Fitting the borders was the most touch & go part of the whole process – fitting a curving border is especially challenging.  Despite all my concerns, it went together quite well and I had the quilt backed & basted only a few weeks later.

 
Quilting is the bottleneck in my part of the woods, so I didn’t quite get to hand quilting until October of that year.  I wanted to use a few shades of DMC Perle #8 in yellow– perhaps to tone down that “interesting” choice of green that I’d made for the background.  One thing about using Perle #8 is that big stitches makes the task a lot faster and luckily, this effect seems to rather suit the look of this project.  I’d wrapped it all up just before my self-imposed New Year deadline in late Dec 2015…
Yahoooooo!!!

Somehow, the dreaded scrap box has appeared to replenish itself.  Is it related to the Cut & Come Again Pie?  (The Magic Pudding” by Norman Lindsay is one of my all-time favourite Australian children’s stories.)

Anyway, so began my obsession with wagon wheels…..


Just for the Record:
Quilt Finished Size: 158 x 158cm
Block Sizes: 55cm
Cut in: Apr 2014
Pieced & Basted: Apr 2015
Quilted: Hand; Oct 2015
Quilt Type: Modern/ Vintage
Quilt Finished: Dec 2015
Exhibited: No
Collection: Home #058
Pattern Name: Classic Wagon Wheel
Pattern Source: Circles of Fun by Sue Ross
Fabrics Purchased: Scraps from the burgeoning stash…
Fabric Design: All Welcome, especially uglies
Fabric Style: Random selection
Materials Type: Printed Cottons
Wadding Type: Cotton
Backing: Pieced using left-over remnants

Fiona's (top) & Erica's (above) versions of this quilt. 
That stripe outer border fabric is all machine pieced too!

Thursday, 5 November 2015

Be It Ever So Humble

There's nothing quite like progress!

Well, it's great to be home and have some time for sewing.  I've eventually put together enough of those little petal squares on my Windom Quilt adaption to make an informed colour selection.  After putting them up, "pales" won out.  Although now, a reasonable stack of "bolds" sit waiting for inspiration and yet another "something" quilt...

So, here it is - photographic proof of being busy at work in the Garden Shed!  FINALLY.


Above photos - 19/3/15
As I worked (photos above), I realised that the pale petals looked better.  Having them up on a design wall allowed me to juggle as I worked and by not stitching until I was really happy with the arrangement, I saved a lot of time and unpicking.  : )

The central medallion is, she said proudly, a UFO from a workshop at the Armidale Symposium. Yes, that was 1989!  It just goes to show that some things should not be rushed....

Photo taken 6/10/15

Tuesday, 10 February 2015

Celebrating

Birthday Fun: 2006

I wanted to make something for a friend's special (60th) birthday, so I put together scraps from most of the workshops and trips we had done over the years and made up a scrap commemorative wall quilt.  I asked all the Quilting girls to sign it after our November meeting – the last for that year.  Forgot to take a photo but I have something somewhere I hope!

The pattern I used is called Scot's Plaid from the ever faithful "101 Fabulous Rotary-Cut Quilts" by Hopkins & Martin.  I think I may have resized the block slightly to be more appropriate for a wall quilt.  It was a breeze to cut and machine up.  The result, whilst not a stunner by any stretch, makes a statement about our time (from the fabric styles) and shared experiences (quilting & workshop).  All floating on a background of Monet's water lilies...

(Found the photos!)


This piece was inspired by my exploration into the work of Edouard Villard (1868 – 1940), a French Post-Impressionist who painted mostly domestic interiors in his trademark highly decorative and sumptuous manner.  His mother was a seamstress and his world it seems, was influenced by the wonderful textiles she handled.  Typically Villard’s paintings are of compressed internal spaces, contain flat surfaces decorated with all-over patterns (eg wallpapers) and mimic the colourful textiles he saw daily.  I really love the way he paints flowers - bold & splashy!  His paintings are best explained as a rich tapestry of softly blurred colours. Doesn't that sound so seductive!
 

"Vuillard12" by Édouard Vuillard - National Gallery of Art,
Washington, DC. Licensed under Public Domain via Wikimedia Commons
 - http://commons.wikimedia.org/wiki/File:Vuillard12.JPG#mediaviewer/File:Vuillard12.JPG/
 

Wednesday, 12 February 2014

Fairies in My Garden

Fairies in My Garden: 2002  (Started: 1999)
It's a pity the colours aren't "true" but I'm lucky to have this photo! 
I started a small wall quilt - my first as a grand-aunt - as a “birth sampler”.  I can remember doing some work on it when we visited the family on holidays in the Queenscliff Caravan Park one summer.  This very small wall hanging took a long time to finish with all the applique and extensive hand quilting; going small didn't seem to make a difference to the time it takes to finish a quilt!  
Not such a good photo (pre-digital) but at least the quilting is visible.
I found this cute Jo Samperi pattern in a 1998 Patchwork & Quilting magazine and it seemed perfect.  I already had some suitable fabrics but didn’t get the project finished for some years (during my time when I was on a mission to get the UFO box sorted, ha!). 

Just for the Record:

Quilt Finished Size: 89x 89cm
Block Size: NA
Cut in: 1999
Pieced & Basted: Machine 1999
Quilted: Hand 2002
Quilt Type: Wall Quilt
Quilt Finished: 2002?
Exhibited:  No
Collection: Private
Pattern Name: Fairy Quilt (Jo Samperi)
Pattern Source: P&Q Magazine, 1998 p52
Fabrics Purchased: My collection
Fabric Design: Prints & Plains
Fabric Style: Cotton
Materials Type: Cotton
Wadding Type: Thin Poly Batt
Backing: Cotton

This is what it should have looked like! (P&Q Mag 1998, p52)
Lessons Learned:
I had enough fabric to start a second of this quilt but it languishes in the UFO pile in my garden shed.  Maybe one day I’ll either get to it or start a variation - or something else.  Always waiting on inspiration to strike!  I am never good at repeating things – once done, I like to move on to something new and more challenging.

Friday, 31 January 2014

Flower of Life....

Tea Reading: 2009  (Started: 1999)


My favourite quilts are made with scraps.  This one is made from a mixed bag of left-overs, charm squares and friends’ donations.  The background is made up of a selection of “scrap” creams too, some from a tea dying episode.  This quilt, though not huge seemed to use an enormous amount of fabric – probably because of the shaped piecing.  Not that that is a bad thing; one just has to work harder to keep one’s stash at a healthy level!

This traditional tea leaves pattern by Judie Rothermel in “Aunt Grace’s Scrapbag” was sourced by Erica (who incidentally made 2 quilts of this particular pattern in lovely 30’s prints no less!) and they were my inspiration to try one.  The top is all hand pieced and kept me busy during those long hot Delhi summers!

For the backing, I used a cotton sarong I had purchased in Kathmandu, and a complementary fabric purchased in Mr Singh’s store, Nehru Place.

Once basted, I started to hand quilt the plain background pieces, but cotton wadding makes for better machining, so I did a small stipple using a variety of cream shades.  This had a nice effect of accentuating each tea leaf shape as I left them unquilted.

This quilt allowed me to try a scalloped edge – and thus the need to cut & make miles of ½ inch bias for a pretty binding.  It wasn’t as difficult as I expected and the bias sat nicely in the tight curves. 

I put my Tea Leaves on show for the Dangar Island Australia Day celebration in 2010.  One of our visitors said that the pattern was an ancient design called “Flower of Life” and is heavily symbolic.

Australia Day Quilt Exhibition Dangar Island 2010
Just for the Record:
Quilt Finished Size: 177x 200cm
Block Size: 12“ circle
Cut in: 1999
Pieced & Basted: Hand 2005
Quilted: Machine 2009
Quilt Type: Group
Quilt Finished: 2009
Exhibited:  Australia Day 2010
Collection: Home# 034
Pattern Name: Tea Leaves
Pattern Source: Judie Rothermel
Fabrics Purchased: Stash
Fabric Design: Mixed
Fabric Style: Cotton
Materials Type: Cotton
Wadding Type: Cotton
Backing: Cotton


Lessons Learned:
I hadn’t hand pieced a quilt for ages and this one seemed to take forever ; ).
  The blocks were very “portable” however, so this became an easy project to work on in those spare moments when life can be dull (eg driving 12 hours to visit relatives in another state).  I also seemed to use up heaps of fabric due to the shape of the leaves, which wasn’t so bad for the scraps but somehow I was always scavenging for backgrounds as I didn’t want them noticeably different from each other.