Thursday, 29 December 2022

Christmas Seminole Tablecloth

Christmas Re-imagined: 2022 (Started: 1987)

My Covid splurge was a new dining room table.  After all, we’d had the sturdy pine one since 1985 and it managed to survive many, many moves and growing children.  So, in December 2021, when I laid out the well-used Christmas tablecloth (made in no less than 1987) on the new table, it looked a little sad.  Hardly a surprise!  So rather than consign it to the bin, I decided on a make-over. 

Yes, the fabrics are definitely a reminder of the 1980’s, and there’s a bit of poly in the cotton selections, but it was worth saving.  I set about separating the two layers (top front & backing), then added some batting.  After wondering for a moment what I was doing when I got it ready to baste, it all came together after giving it the kiss-of-life with machine quilting in a medium stipple – a quick and easy pattern.  I chose a variegated thread to quilt with; bright red, green & a touch of yellow (Gutermann, Sulky 30wt, Colour: 4112, Vintage Holiday).  Finished size at a decent W 143cm x L 248cm.  And I am so over-the-moon with the result.  Should have done it years ago!!

I finished the Christmas Tablecloth makeover on 28 November 2022, just in time for this year’s celebrations with grandchildren.  Better get to decorating the rest of the house, there’s only a few weeks to go!

Making progress at the machine in the cooler weather this year

I am hopeful for a few hours of sunshine to have another photo session.  There's quite the backlog of quilts needing a photo or several.  Fingers crossed that the weather improves!

A temporary "indoor" fix until the sun shines again...

Tuesday, 13 December 2022

The Governor's Invitation

 Virginia Reel: 2022  (Started:2021)

I had in my stash a small collection of 1800’s reproduction prints, and had been waiting for the right moment to use them.  I’d seen a wonderful antique pinwheel quilt made in Maryland (1860-1880) in QuiltMania (141, p.17) and that sparked an idea. 

During our stay in Virginia, we had visited Colonial Williamsburg. I never tired of visiting the Governor’s Palace, for its beautiful gardens and inspiring décor.  The Ballroom was especially impressive with bold pinks and bright blues.  Given the local and natural dyes we had seen at nearby Jamestown (albeit used much earlier), the colours in the Palace seemed so surprising but the wealthy were, of course, able to access the best on offer from Europe and elsewhere.  So, there I was in 2019, at the Abby Aldrich Rockefeller Folk Art Museum Gift shop stocking up on (just a few more) colourful reproduction prints from that era.  After all, they were also on sale for a bargain price.  Who could say no to an offer like that?


In the Garden Shed and loving it!
Back home, it took until 2021 before I found a traditional pattern called Double Pinwheel that coupled with my heritage print collection, conjured up a vision of whirling couples dancing the night away in their finery at the Palace.  Needless to say, I had to add quite a few non-reproductions (in the right colours & only from the stash) to fill out the required number of pinwheels.  Eighty to be precise!  Eight rows across and ten down.  I also decided, as I stitched, that I preferred the look of all blocks and no border, with just a “low value” binding so as not to detract from the energy as the colours whirled and soared.

To bring the vision together, I machined quilted (on my trusty domestic, Bernie Bernina) a dense pattern of sweet peas (you will have to use your imagination here, I’m afraid), leaves and vines – nature at its chaotic best.  Such quilting is rather stiff, but I’ve found that it does soften, or relax, a bit over time. 

On the bed in the motel room - the best out-of-the-wind spot we could find...

Sweet Pea Quilting

Just for the Record:
Quilt Finished Size: 156 x 196cm
Block Sizes: 20cm (8 inch) unfinished; 7.5 inch finished
Cut in: 30 July 2021
Pieced by: 10 Aug 2021
Basted by: 18-19 Oct 2021
Quilted: Machine Nov 2022, over 6 days; 4 reels Gutermann Sulky 30wt 4010 (Caramel Apple)
using 24 bobbins Gutermann Quilting Cotton 50wt (variegated dark to light brown).
Quilt Type: Traditional
Quilt Finished: 16 Nov 2022
Exhibited:
Collection: Gifted to Florence 19 Nov 2022 (Greg’s 80th Birthday)
Pattern Name: Double Pinwheel
Pattern Source: Hopkins & Martin, 101 Fabulous Rotary Cut Quilts,1998, p.75
Fabrics Purchased: From Colonial Williamsburg; also, The Calico Patch, long-closed quilt shop in Nicholls, Canberra; and a few more during RLI expeditions over the years.
Fabric Design: Reproduction Prints & Stripes, plus many extras
Fabric Style: Period Reproductions, American Revolutionary Period & Civil War & others
Materials Type: Printed Cottons
Wadding Type: Cotton (Warm & Natural, Needled)
Backing: Pieced simply using left-over remnants 

The Governor’s Palace in Williamsburg, Virginia was originally built, starting in 1706, in English Baroque style however was destroyed by fire on Dec 22, 1781.  The existing reconstruction was started in 1931 in Colonial Revival style. 

We tried a few outdoor shots the next day
but it was way too windy!

Saturday, 10 December 2022

Languish Not…Make Another Quilt!

2022

2021 vanished in a flash, leaving me counting UFO’s and dreaming of more fantastic quilt designs to add to the “To Do - hopefully one day soon - List”.  Hmmm, I should stop reading those enticing magazines!  The year did finish with a flourish, however, as I managed to add 4 quilt tops to the “basted and ready for quilting box”. 

The new year however, became the year of catching up with family & friends as borders and boundaries opened.  Our poor car did not sit idle for long at all as we galivanted across 4 states before settling down to a cold and rather wet winter on the river.  Too cold and wet to work in the outside sewing room (my garden shed).  Meanwhile, other indoor projects took priority; sorting photos being one huge job that has STILL to be finished.

At least the RLI girls were able to meet at Randwick again, and aside from the odd bout of Covid isolation and overseas jaunts, we’ve settled back into the old meeting routine.  I’ve now limited myself to taking portable projects to the meetings too, after having my sewing machine in for a service & repairs twice last year.  It just doesn’t enjoy travelling the way it did in its youth!

So, it was with some relief then, that in October, I had reason to limber up and get Bertie primed for a session of free motion quilting.  Woohoo!  Off and running at last.  Now I am working on quilt #4, so it is good to see a nearly empty box on the shelf.  I seriously doubt it will be done by Christmas this year; it still has quite a bit of embroidery to add once the quilting is done.  Never mind, it’s all progress. 

Wishing everyone a Merry Christmas, a prosperous New Year and time for lots and lots of stitching.

Clip Art from The Graphics Fairy

Friday, 9 December 2022

Stylish Gifting

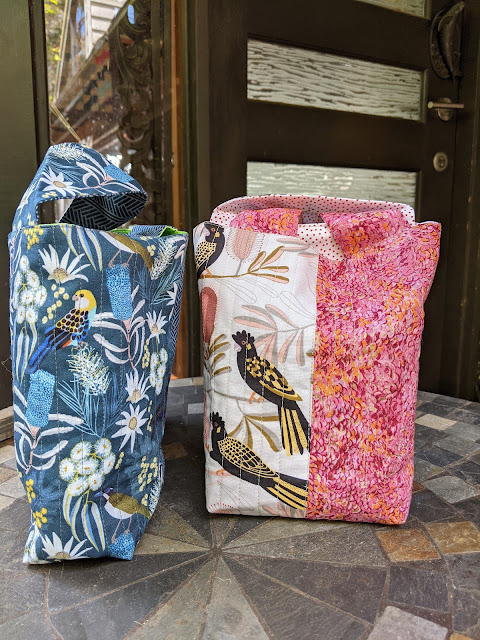
Japanese Knot Bags 2021

Again, and after successful home-made gifting in 2020, I was determined to give it a shot in 2021.  I was on a roll!!  I decided to undertake another set of bags made of fabrics selected only from my stash.  This time, I wanted a smaller bag but with a twist; again, a reference to Japanese style.  This time I concentrated on a more traditional knot bag handle design but wanted a “standing” bag – a square bottom.  It needed to be big enough for a large phone or mail (yes, we still get letters, mostly bills ; ) in the post) and would keep keys, masks and other odd bits together if dashing to the shops. 

I settled on a great pattern from sumoftheirstories.com, found on 23rd October.  I cut all the bags out at once (8 Nov) and then started madly sewing until 12th December, cutting it quite fine for Christmas gifting.  I did though, have fun with a Spotlight selection of Aussie flower and bird designs by Jocelyn Proust.  Don’t you just love her modern prints! 

Finished Size of bag: w-4.5; h-7.5; d-2.5 (inches) & w-11.5; h-19; d-6.5 (cms); Finished size of straps or handles: Width: 2in or 5cm; Lengths: long strap L-12 (30.5cm); short strap L-7 (18cm).  Sizes are for your information only and are in accordance with changes I made to the original pattern offered on sumoftheirstories.com to suit my needs.  Once cut out and quilted (onto wadding leftovers), I could make 3 to 4 a day.  

These bags worked up a treat, were relatively simple to make and I think, were well received.  Over the year, I finished off a few more, in all 27 bags completed.  I used them for Christmas or thank-you gifts; many were donated for raffle prizes. 


Thursday, 28 July 2022

Cheese & Mustard

Scrappy Bow Ties: 2021  (Started: 2020)

There’s nothing better than putting together all those odd scraps that are too good to throw away but just never seem to be "just right" when planning a new quilt.  I certainly needed to find something to suit a bundle of squares I’d cut ages ago that were sitting idly in my scrap bin.  Enthused by Bonnie Hunter’s scrap philosophy, and the amazing results she achieves, I launched into her Cheddar Bow Ties pattern (2011).  

All I needed were 3 x 2 ½" squares of each fabric to be able to cut sufficient bow ties to make blocks for a decent sized quilt.  Bonnie used a cheddar fabric as her background. Yellow cheese is very popular in the US.  (US-ians like their butter white, too!  We think it’s a real hoot since we’re partial to white cheese and our yellow butter!).  Back to background choices…for some mad reason I went for a caramel colour (Dijon mustard, anyone?) which looked fine with my individual blocks but somehow became Doctor Strangelove and took absolute control when the top was finally pieced.  It was too late to make any changes, so I just had to go with the “flow” and try to make the best of a not-so-appealing background.  

This was supposed to be a “quickie” but I guessed machine quilting was not going to do anything to soften my background choice, so instead settled on hand quilting and using a thick perle cotton thread.  Deep in my thread box, I discovered some skeins of sashiko thread; a nice variegated red through green with an acid green/yellow as well.  I needed a crowbar of a needle, no hoop, miles of masking tape and lots of patience; but it’s finished at last.  The lines are ½” apart and I worked out each one took about 45 mins or more to do.  At best, I managed 3 rows a night, with regular breaks to rest sore fingers.  I’m holding off doing some Japanese boro work for a little while now.  Although I NOW have to confess to loving the look.

I tidied up the edges with a wild Aboriginal design full of colour and movement.  It’s Shirleen Campbell’s “Women Dancing for Rain‘.  It’s an unusual choice for me for this type of quilt but came about after (fabric) shopping with my quilting buddy, Yvonne.  It really does help to step back sometimes and consider other people’s opinions.  


Just for the Record:
Quilt Finished Size: 169 x 169cm 
Block Sizes: 10” (made up of 4 x 5” bow ties) 
Cut in: 12 Apr 2020 (started)
Pieced: 22 May 2020
Basted: 18 Jun 2020
Quilted: Hand: 28 Sep 2021
Quilting Thread: Japanese Sashiko Thread x 2 skeins
Quilt Type: Traditional 
Quilt Finished: 30 Sep 2021
Exhibited: 
Collection: Home #073
Pattern Name: Cheddar Bow Ties
Pattern Source: Bonnie Hunter, 2011
Fabrics Purchased: From the Stash…
Fabric Design: Prints, Stripes & anything to hand really
Fabric Style: Old to Bold
Materials Type: Printed Cottons 
Wadding Type: Cotton
Backing: Pieced using left-over remnants 

Wednesday, 13 July 2022

Further Reductions to the Scrap Box

Doll’s Bed Quilt: 2021

Little Miss came to stay and while I stitched some of her “clothing repairs”, I set her a task to make a pretty design using some 2 ½” squares I’d cut from leftovers for my scrap bin.  I’d been inspired by Pat Sloan’s very practical scrap sorting philosophy.  Let’s just say, it’s a fantastic idea and soooo organised…but a lot of work (just yet for me, anyway!) with my scrap box still fit to burst.

We decided that her design looked so nice it was deserving of being sewn up into a doll’s quilt.  I finished it off after she’d left for home, adding a cute little pillow and as a special surprise, finished off a cloth doll kit she’d been given as a gift. 

How wonderful to finish something in a matter of days! 

I watched quite a few great videos to work out sizing and this one by Treasurie (less than 4 minutes) was certainly helpful, particularly for making the pillow and pillow case.  Size depends very much on the doll and the bed you have. 


Just for the Record:
Quilt Finished Size: 37 x 40cm
Pillow Finished Size: 19.5 x 11cm
Mermaid Finished Size: 36cm tall
Block Sizes: 2”(quilt & pillow) finished
Cut in: 18 Aug 2021 (started)
Pieced & Basted: 25 Aug 2021
Quilted: Machine: 25 Aug 2021
Quilt Type: Doll Quilt
Quilt Finished: 28 Aug 2021
Exhibited:
Collection: Gifted #23
Fabrics Purchased: From the Stash…
Fabric Design: Prints, Stripes & Dots
Fabric Style: Brights
Materials Type: Printed Cottons
Wadding Type: Cotton
Backing: Pieced using left-over remnants

Saturday, 11 June 2022

TideMark

Tidemark: 2021  (Started:2019)

I just love scrap quilts and after a rather too-long hiatus and an overflowing scrap bin, I felt the urge to search the net for inspiration.  Thanks to viewing an “extreme” (well, for me) quilt collection makeover by Pat Sloan, dying of envy for Jeni Baker's (In Colour Order) organised stash and suggestions by my friendly quilting buddies to check out Bonnie Hunter for her scrappy quilts, I present to you my take on Bonnie Hunter’s 2014 leader & ender challenge quilt.

Bonnie’s original design inspiration came from an old quilt named “Stained Glass”. It was made in 1890 by Frances Clarke Westergren of Boston and can be found in the book “Massachusetts Quilts, Our Common Wealth”.  It looks just fabulous as it is but also serves as great design to mess about with and to add your own personal touches. 

My scraps were not so much scraps but fabrics from a Moda Metro Mixologie Layer Cake pack lying dormant in my “Collections” box just waiting for the right moment to present itself.  I wanted a modern look, and if anything, thought using this selection of fabrics might lead to the quilt looking a bit too samey-samey (bland!).  Perhaps to rescue it, I decided on a black and whites for the corner blocks.  Not wanting to waste any of my Layer Cake pieces, I modified Bonnie’s block to suit, i.e. larger pieces.  Now that took some math effort! 


I’m normally fairly lazy when it comes to cutting – lulled by the ever-accurate rotary cutting instructions in Judy Martin’s books, so this came as quite a shock for the old grey matter.  Never-the-less it worked out and my math held up, until after a loooong break in proceedings, I inadvertently cut my remaining corner squares the wrong size.  Back to the drawing board, hi ho!  I now cut shapes then store them in sandwich bags; all clearly labelled with sizes.  

I’d planned to make this for a friend’s 60th (it did take a wee bit longer though) as the colours seemed to suit those chosen for her house renovation.  And the modern design, highlighted by the black & white corner blocks, looked great.  To me, it was very much in keeping with her outlook on life.  She loves the water, and as the quilt looked rather like tiles in an exotic swimming pool, I chose to finish it off with a medium stipple (or meander) pattern.  

For those interested in Pat Sloan’s stash management process, here is a link to her blog post.  Pat offers a quick and easy approach to sorting out the bags, boxes and suitcases full of scraps into functional scrap sizes. Now all I need is the time to be so organised - ha ha!   

The garden is a bit too shady to show the quilt colours at their best


Just for the Record:
Quilt Finished Size: 159 x 190cm
Block Sizes: 4.5 x 8.5” rectangles; 2 ¾” squares (incl s.a.)
Cut in: 17 Jan 2019 (started working out pattern size)
Pieced Started: 21 Mar 2020; Finished: 28 Dec 2020
Basted: 2 Jan 2021
Quilted: Machine: 15 Mar 2021
Quilt Type: Modern
Quilt Finished: 24 Mar 2021
Exhibited:
Collection: Home #071
Pattern Name: Lozenges
Pattern Source: Bonnie Hunter 2014 (PDF pattern here)
Fabrics Purchased: Moda Metro Mixologie layer cake…
Fabric Design: Prints, Stripes & Dots
Fabric Style: Brights
Materials Type: Printed Cottons
Wadding Type: Cotton
Backing: Pieced using left-over remnants
 
Progress underway in 2020

Thursday, 9 June 2022

Cross Roads

At this point (the start of 2021) and with time at home to think, I found myself dithering over where and how to organise my posts featuring finished quilts.  When I started this blog, it was easy to list quilts by "year started" as all I had was a photo of a finished article.  Now I am at a cross-roads with UFO’s.  I have bits & bobs here & there and lots on the go in the WORK BOX too.  Not to mention quite a few unfinished items.  I wonder (to myself loudly) if it wouldn’t be easier to change mid-stream and begin tagging projects by year finished.  What a beat-up!  What a lot of work!

But this great idea has since hit the floor with a thud… Everything would have to be re-arranged and perhaps nothing would make any sense.  There would be no apparent logical order.  And the world as we know, loves order.  Yes, even finding it in chaos. 

However, I've since had an epiphany. My plan now, after all this wasted time on “will I or won’t I” debate, is to note:

   1. The FINISH & START year in my post sub-headings. 

   2. The FINISH year in a "label cloud" making it easy to search.  

All dates will still be located in "Just for the Record" notes of each finished quilt and every post will still be dated according to time/date posted.  In all, this organisation should allow me to easily find key quilt dates, and enable linking of posts (perhaps), even in-progress reports (if I'm super-keen).  I’m so very slow to finish quilts, some taking years (and years) to finish so it is easy to forget details.  And doesn’t everyone keep digital photos and an excel spreadsheet (a documented quilt list) of their wonderful creations?

There, that feels better.  Now, did you really need to know this? 

Wildflower in the Blue Mountains


Wednesday, 2 February 2022

Shopping from Home - oh, stash...

 Making Christmas Gifts (Japanese Rice Bags) 2020

In the interests of “shopping from home” for Christmas gifts in 2020, I decided to make simple bags from my stash for family and friends.  I wanted something that was a useful size, not too complicated to sew and yet looked a bit different.  Take a bow, the humble Japanese Rice Bag, Komebukuro.  Stuart Hillard offers an easy-to-follow tutorial that makes fun viewing. (Link to his Japanese Rice Bag tute here).  Stuart’s pattern is a classic box shape but I wanted something a little more tote-like (probably not a rice bag, then?) with handles.  I’d also seen a pattern with ties rather than handles, a Furoshiki Tie Bag but the pattern was rather complex and used quite a bit of fabric.  BeBe Bold had a nice one but they don’t appear to stock it any more.  It did require quite a bit of fabric making it somewhat of an expensive kit.  This one by Kokka Fabrics looks good too – but I’ve not tried it yet.  (Now that I look at it, the Kokka pattern was similar to the one included in the BeBe Bold kit!) I really loved the little tie handles that made it just so sweet.

Margaret uses hers for her knitting 

Eventually, I settled on a pattern from SewCanShe.  Her Japanese Tote comes together very well and I managed to make two, maybe three bags a day, once I had everything cut up and ready to sew.  I also used wadding leftovers rather than interfacing to strengthen the bag.  I didn’t add drawstrings, they pulled the bags and made them look a bit too unstructured for my liking.  The bags worked up a treat, were relatively simple to make and I think, were well received.

A fun print and who doesn't love polka dots?

Of course I gave them all away before taking a photo.  As you do!  And as we're not quite out & about so much these days, it may take a while until I can locate one for the blog shot...
 

(Ed: Visits made and photos finally taken...only 18 months later!!)